Information Request Workflow Automation was introduced here as a way to improve productivity for public sector IG Teams. Some Use cases are listed. We show how one of them might be automated and how the User Permissions work to make sure only the correct people design and deploy the robots.
Proof of Identity Workflow Automation
The example below is a abridged schematic of SAR workflow. Obviously, there is much more to it and more detailed workflow charts can be found elsewhere on this site.
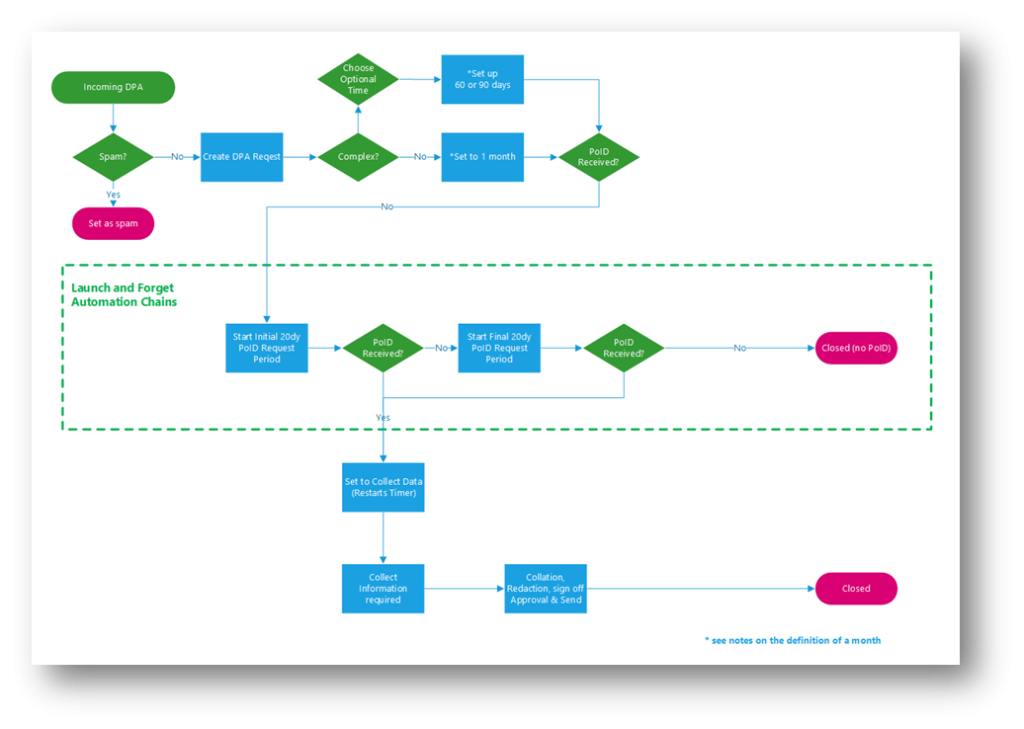
Automation steps
Typically, the process building this in to your AXLR8 IRMS starts with your requirements.
- In Document Template Admin, build the messages for each stage in the medium desired. Usually these will be emails, SMS Messages or Word documents. For example reminders using Trigaware™ after waiting for a PoID for a SAR. The messaging can be simple or intelligent with personalisation and very specific conditional contents. (see smart messaging).
- We set up a “custom event definition” (i.e. the point in your workflow at which you need the document to go to the client).
- Define the Status Life Cycle: the next section describes how to define a time limit for a status and any status change that follows completion of that life cycle. The life (cycle) of a status is the time it runs for or period before it closes itself and kicks off the new status.
Stage 1 Messaging to match your status change requirement
These examples match the work flow above.
- Inform the applicant that the IG team need this from the applicant when the IR is set to “Clarification Requested”
- Then alert them that 20 days has passed and there are 20 days remaining before they will have to resubmit their request. This would happen when the Clarification Second Request auto launched itself.
- The IR will close when the 40 days end and there has been no Clarification (or PoID). A third Trigger email can be programmed to go out. It would inform the applicant that their IR is now closed. They will have to resubmit it if they still need the information.
Stage 2: Create Automated Information Request
The best way to accomplish your objectives for Information Request automations is to create new IR Statuses. The reason for this is that all existing IRs that are running with that status will suddenly automate. If that is OK with you, go for it. We will describe how you do that below but you should consider the safer route of creating and applying a new one.
Please refer to the screenshots below which show the update of an IR Status and the creation of a new one.
The existing IR Status called “SAR ID Requested” for this client could be upgraded by:
- adding the tick for Time limited Status
- adding a duration of 20 days
- selecting a carry on status (in this case it will “Final SAR Request”)
- ticking the box for Special User Access. (see “User Permissions” below)
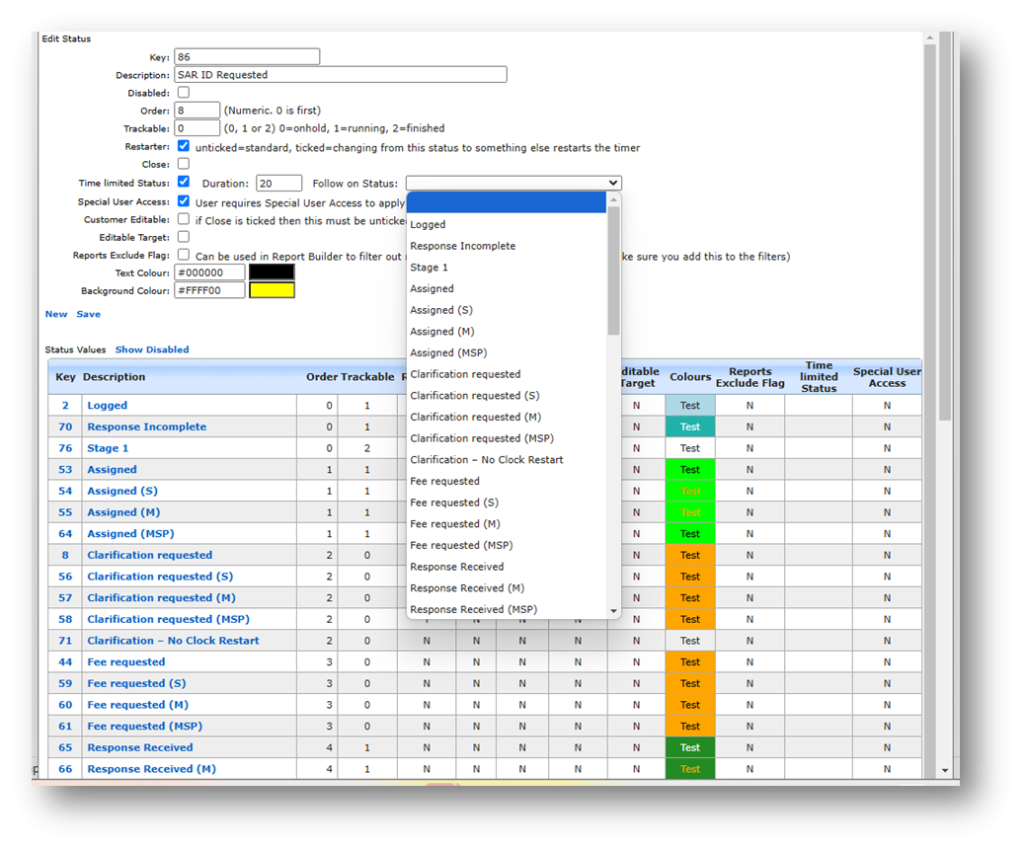
So after 20 days from the initial request, the IR is automatically sent to the next status of a final 20 days where they are on notice that the IR will be closed after that period. This is a total of 40 days. Very reasonable if you automate some reminders for the applicant as well.
In the above example, we updated and existing IR Status for our first 20 day SAR Request for PoID. Below we have created a new Information Request Status, also 20 days in duration and the last 20 day period they have in which to prove they are who they say they are before work starts finding their requested information. In the green box, to confirm the process above, we did the same ticks and duration. The difference is that the end of the 20 days automatically changes the status to Cancelled by Requester. Again, your organisation may have different vocabulary. You might call that “Failed to supply PoID” or some other label. In any case, it would close the IR because this final status would be a “finished” status.
So, we now have a “chain” of three actions that will hand over like a relay race with no human intervention necessary until PoID is received and agreed as valid, one day. Then the automated process is stopped and work begins with that request.
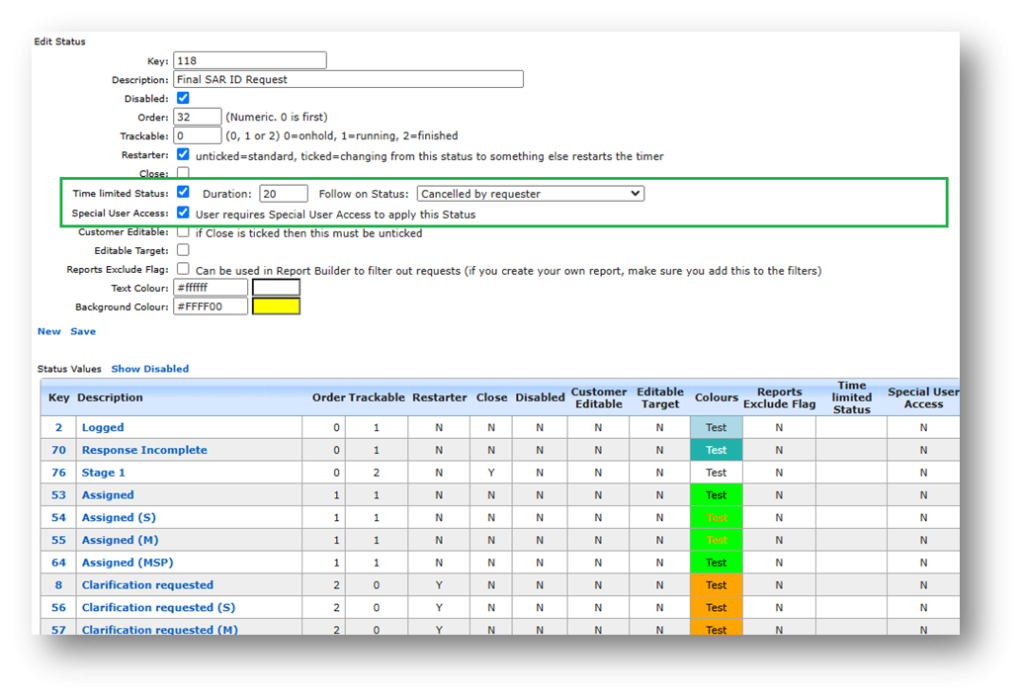
NB in the above example, you will see that this IR Status is disabled (tick box at the top). That is because We have not yet applied user permissions (or tested it).
Note. It is best not to apply the time limited status settings to existing IR statuses unless you are confident you know the outcome. The next time it runs, it would run on all the existing IR records that have that existing status. Do you want that? If you do make a status time limited, it would be best to search to see how many IR’s have that status, and understand that if they were given it more than the duration number of “valid” days ago, that “it will” change the status next time it runs.
Stage 3. Review User Permissions
Not all users should have the authority or expertise to apply a timed status. They may launch a wrong workflow automation. For example, without knowing the next steps, they could create an infinite loop. Users need to have the new user permission to apply one of these time limited statuses when they are first created. Later, when ta few runs through have proven the automations, you can remove the restriction from the IR status. This is done by removing the “Special User Access” shown in the screenshots in the previous stage. Below is how we can set up a knowledgeable pilot user to be able to use the new timed IR Statuses.
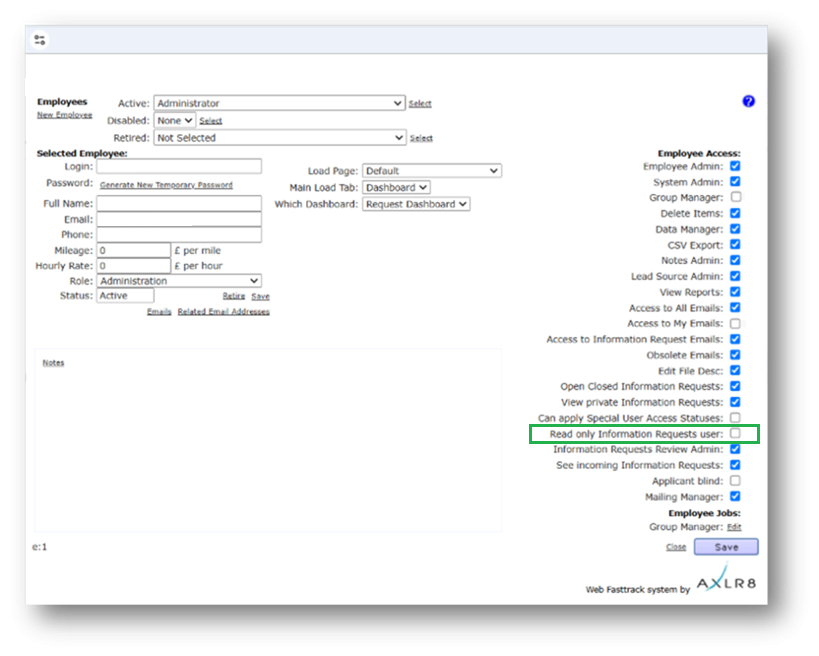
There is a new User Permission. It is called “Can apply Special User Access Statuses”, on user admin. Here is an example from a real client showing where it is on the User Admin screen.
If a User tries to apply a Time Limited IR Status to an Information Request, they may not be able to do so. If they do not have permission, they will get the following message.
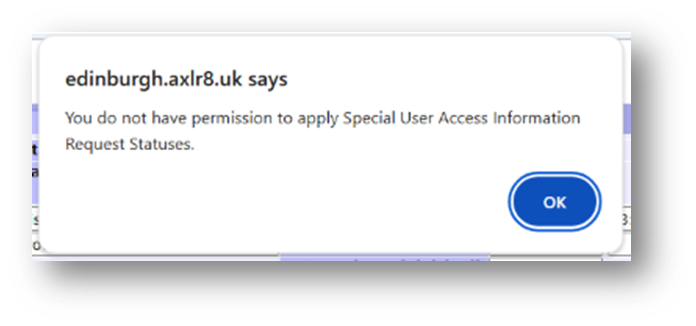
For someone with this permission, the above alert message (example from City of Edinburgh) will not appear. That User can save their chosen status.
Systems Admin Permissions
As described above, your Super Users may decide which Users may apply these IR Statuses with timings built in. I.e. the “special User Access” IR statuses.
We have disabled update rights for clients but you have complete visibility of information Request Statuses. You can request an AXLR8 consultant to make the change. Thus in your office, similar to the Dropdowns admin for Request Type, the Dropdowns Admin for Information Request Status only has a Save function when one of our consultants is using it.
It is not available from client offices. AXLR8 have retained some of the administrative privileges for our support specialists for Request Status Admin.
The “Save” function in Information Request Status “Dropdowns Admin” was always available for Super Users at our clients. However, the ability to save changes in Request Type was reserved for AXLR8 consultants. The reason was the cost to us of fixing mistakes. With the power of this new Workflow automation we need to work with a few clients to take responsibility and shoulder the expense of any errors before handing back the ability to save changes. We also assume most client Super Users would wish to work over a Teams meeting screenshare with an AXLR8 support consultant when building these IR Automations. The reason is that mistakes can be costly to fix.
Audit Log
In the audit log view we can see the Cancelled status is a “Close” status, the save object has also set the “Date Closed” date (same as if you set the IR to cancelled in the IR details screen).